The Savonius Windmill Generator
Posted: 2005-August-9 Filed under: Power Source, Projects, The Bike With 2 Brains Leave a comment »I decided that in this last week or so before I leave town, I'd pick up one more task: build a Savonius generator on the Bike With 2 Brains. So on Tuesday morning I got up and started thinking about designing it. I figured out that the bicycle seat posts are the right size to fit the "#608" size skate bearings — I had bought a pack of them because the 8mm hole is just a hair bigger than the 5/16" (7.99mm) threaded rod and bolts I planned to be using.
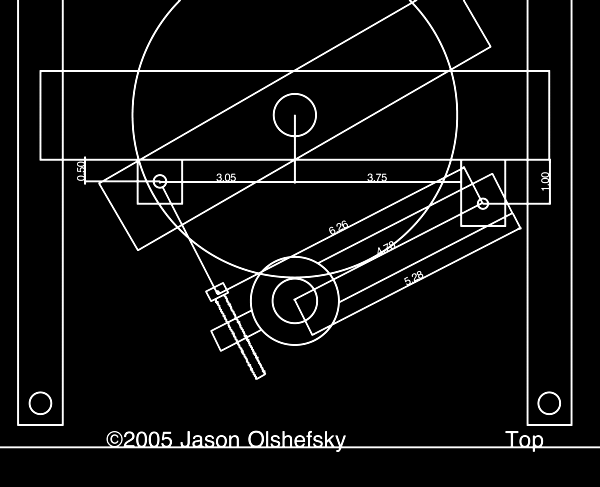
Wednesday I got up and started designing it in CAD. By 11 I came up with building a basic cube frame with a pair of centered cross-beams from side-to-side to hold the rotor. The key part is the detail below with the arm to hold the generator with a friction-coupling to the baby-stroller wheel (which is ultimately why I went with 5/16": it's the shaft diameter of the stroller wheel.) The diagram of this detail is below:
Basically, the rectangles on the left and right are the frame mounts and the center horizontal rectangle is the support bar. The small central circle is the bearing and the large circle is the baby-stroller wheel with the centered diagonal rectangle representing the 2×4 used for the rotor. The angled dimension lines surround the generator bar — the larger circle below the baby-stroller wheel is the motor housing and the smaller is the motor spindle (a wood dowel.) The line connecting the bolt (it's supposed to be a bolt and looks better in CAD zoomed in) is linked to the center frame by a spring.
I built a rotor that afternoon. The original one I designed had two problems: first, the shaft holes weren't well centered, and second, the top and bottom plates were not exactly parallel. I paid more attention to those two problems and things came out much better. I also used whatever remained of the vent pipe I had bought — it's just like the original prototype except that it's about 14" long. I even got the bearings mounted on the end and thought, "gee, that's it?" expecting it to be harder to make.
Thursday I got up and started working on the frame. I welded together a basic frame and rethought the cube shape: instead I went with a wide bracket for the rotor bearings and put the vertical members on either side of that. By that evening I had finish-welded the frame and tack-welded the brackets to mount the generator. It was almost hard to assemble it in the very light breeze because the rotor would spin so easily.
Friday I built the rest of the motor mount, mounted the preferred motor, and tested it against the fan in the attic — essentially the blower from a furnace. I was able to get about 4.5 volts open-circuit, 2 volts into 5 ohms (0.8 watts) and 1.5 volts into 3 ohms (0.75 watts.) I had to use a weaker spring than I started with because the friction of the stoller wheel against the dowel was too much when it was pulled tight. I don't know the wind speed nor the rotation speed, but it was pretty dangerous looking. I finished up the brackets and threw on some paint in the evening.
![]()


Recent Comments