How do I un-delete an app icon in BlissLauncher?
Posted: 2025-March-30 Filed under: Computers | Tags: Android, BlissLauncher, eOS, Murena Leave a comment »For reference, BlissLauncher is the default launcher of the /e/ Android-based OS a.k.a. eOS, installed by default by Murena on their Android phones.
Just recently I grabbed my phone and apparently had my finger on the screen, so the display switched to "alter icons" mode where they wiggle and you can move them around. I inadvertently removed an icon which proudly notes how you can remove and icon from a non-system app by clicking the circled-minus "⊝" button. However, nowhere can you find how to add an icon for an already-installed app.
As best I can tell, you can't. Unless you're a software developer and can alter the configuration files.
It's so stupid: you have to uninstall the app then reinstall it.
Coercing DéjàDup to run a full backup
Posted: 2021-February-19 Filed under: Computers Leave a comment »A while back I started using a Librem 13 laptop running PureOS which is derived from Debian Linux. It has a built-in backup program called DéjàDup which is "really just a clever graphical wrapper around the command line backup tool duplicity." It runs incremental backups daily and will "occasionally make fresh full backups for you". The documentation is crap (as of 2021-Feb) so there's no way to make it do such a backup on-demand.
One issue I have discovered is that its incremental backup only looks at the file times (presumably the modified time) to determine which files are new. Ordinarily this is no problem, but I recently migrated thousands of files from my old computer and maintained the dates. As such, DéjàDup just ignored them. I needed to get it to do a fresh backup.
I found a note on the developer site which suggested editing the settings manually "(dconf-editor or the gsettings command line might work)". I dug around with using gsettings and found the following things that might help:
| Command | Notes |
gsettings list-recursively org.gnome.DejaDup | Lists all the settings for DejaDup. |
gsettings get org.gnome.DejaDup full-backup-period | Displays the current number of days between "fresh full backups". |
gsettings set org.gnome.DejaDup full-backup-period 1 | Sets the number of days between "fresh full backups" to 1 day. |
What I did was to close Gnome Backups (the front-end name for DéjàDup) then execute:
gsettings set org.gnome.DejaDup full-backup-period 1
I then launched Gnome Backups again and started a backup. It fortunately said it was doing a full backup. I immediately reset it on the command line but it changed behavior and did an incremental backup instead so I had to wait until it finished, then went to the command line again and reset it, this time a little shorter than the default:
gsettings set org.gnome.DejaDup full-backup-period 60
This seemed to do what I wanted.
Call with Google Voice through your own phone
Posted: 2020-August-26 Filed under: Computers Leave a comment »In August, 2020, Google Voice shut down the "classic" user interface on their website. It was far faster than the bloatware version, so I had been using it for a long time. One feature that appeared to go missing on the new version was the ability to place a call by having Google call you on your phone then connect you to the desired caller—the new version only seemed to support calling through your computer.
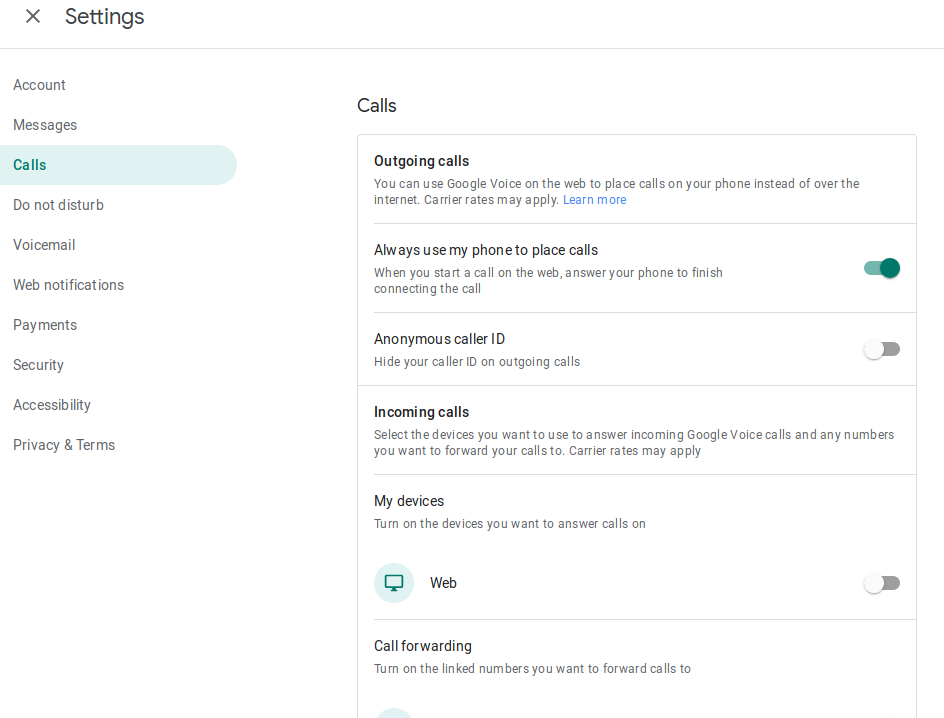
I didn't find a way to do this until I was digging around in the settings. In the "Calls" section, there is a switch to "Always use my phone to place calls" and they describe it, "[w]hen you start a call on the web, answer your phone to finish connecting the call". Switching this on will use your phone to connect calls.
Also, there is an option to deactivate placing or receiving calls on the web. I find it annoying that if I have a Google Voice tab, a call coming in will "ring" through the speakers even though I never use the web calling feature.
Disabling the Local Control on a SR227 X-10 SuperSocket
Posted: 2019-December-29 Filed under: Electrical Leave a comment »X-10 is a system for controlling various modules (such as dimmer-controllable lamp modules and on/off only appliance modules) using signaling sent through the electrical system of a house. According to the Wikipedia article on the standard, the standard was created in 1975 and works on various international household voltages and frequencies. I have a system in my house which uses a Tandy Model 102 computer running my own BASIC program to provide home automation, interfaced to the X-10 system using a Marrick MA-RS232L LynX PLC Interface.
Most appliance and lamp modules had a feature called "local control" which worked by switching the appliance or lamp's switch off-on-off somewhat quickly to make the module switch on. I've generally disliked this feature as it fails in a couple ways. If if a device cycles on-and-off periodically itself (like a space heater), it will often trigger the local control and turn on unexpectedly. Second is if a device has "futuristic circuitry" (e.g. made after 1975) like switching power supplies or LED lamps it tends to trip up the local control circuitry and turn on automatically. Fortunately, it seems the designers realized some people would dislike the feature, so they often included a jumper wire right on the circuit board inside the module which could be cut to disable it.
I searched for an article specifically addressing the SR227 X-10 SuperSocket for the North American market (120VAC, 60Hz) but didn't find anything. This article on X10Community.com1Internet Archive link outlines the basics, including a circuit diagram for the appliance module, and is the basis for my own tests on the SR227. I took it apart and found it used the same 78570 chip as the appliance module in the aforementioned article.
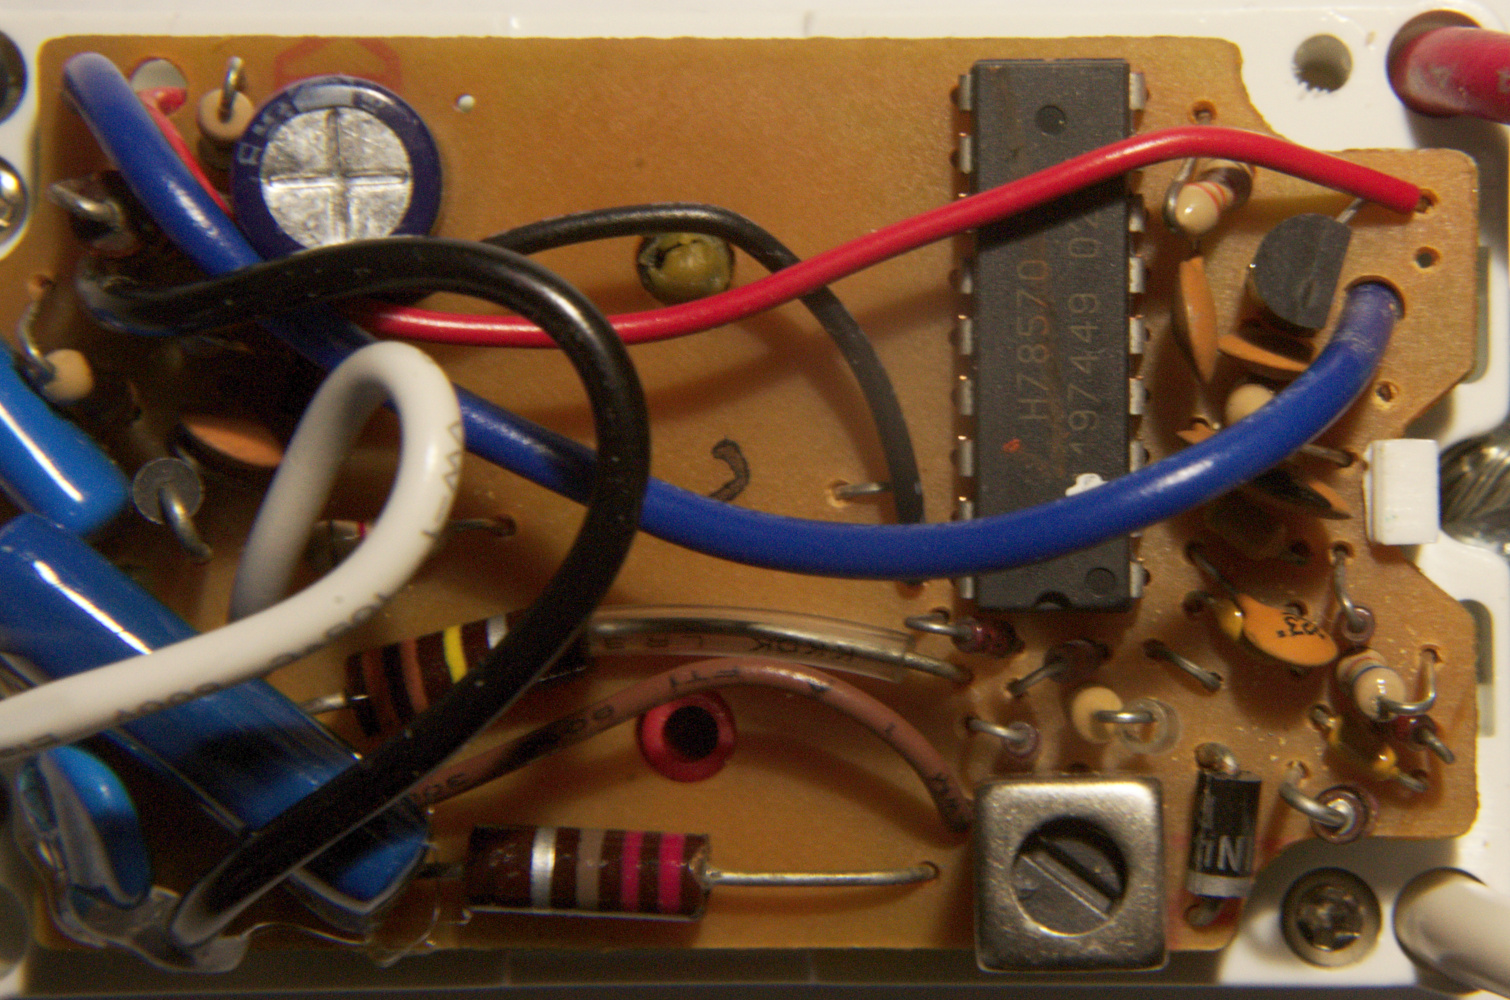
SR227 Circuit board top.
As it turned out, there was indeed a jumper tied to pin #7 that could be cut.
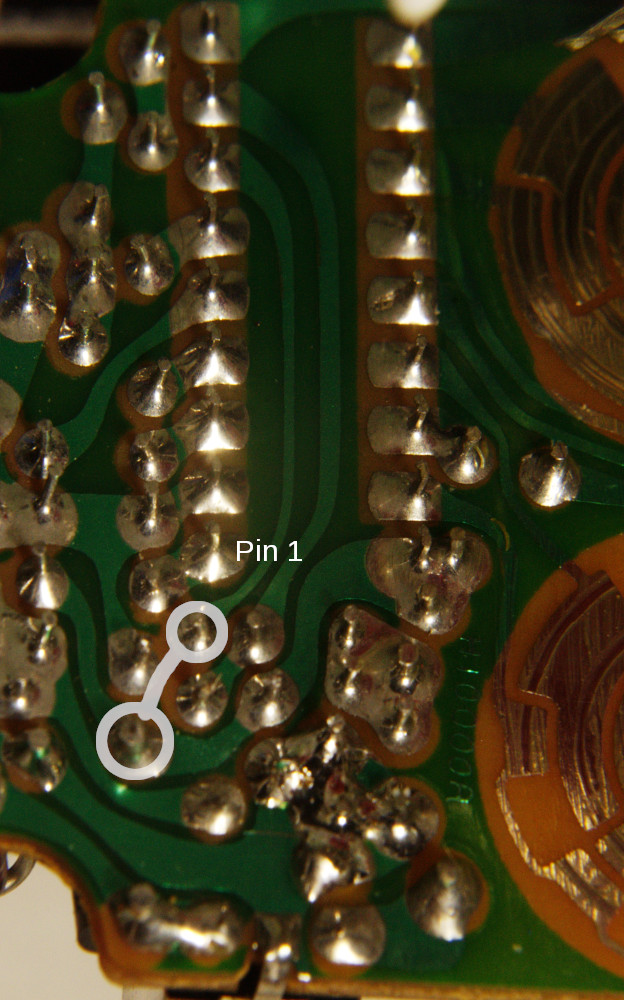
SR227 Circuit board bottom.
It is located near pin 1 of the 78750 chip next to the diode. There is a second jumper near pin 16 but it is part of the circuitry to select the module and house number.
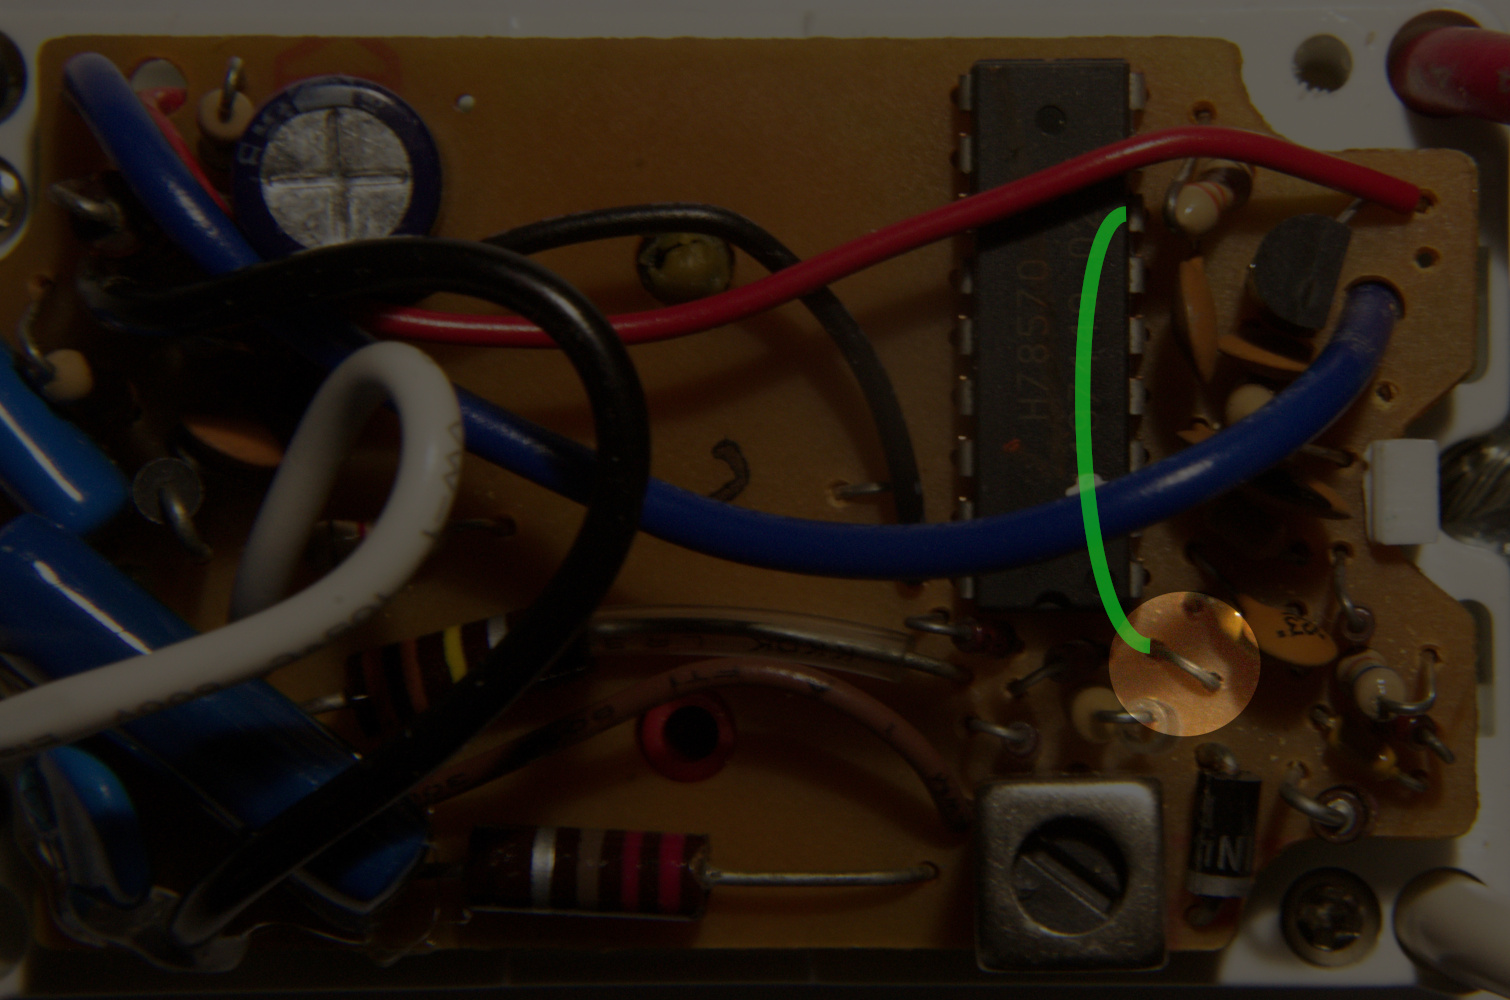
SR227 Circuit board top with jumper and trace highlighted.
You might have noticed that my module has a red wire that comes through the electrical wiring hole near the upper right corner of the circuit board. I soldered this to the relay output so the inside of the electrical box could have access to the controlled circuit. In fact, that's specifically why I wanted to use this module: simply to have a switch for a circuit inside an electrical box. If you have enough experience with electronics, it is obvious where and how to solder on such a wire. (Not to be too snide, but if it's not obvious, please refrain from attempting it.)
Zippo Blu2 Lighter Cleaning
Posted: 2018-September-6 Filed under: Cleaning | Tags: Blu2, butane, flint, lighter, piezoelectric, Zippo 1 Comment »
About 3 years ago I bought a Zippo Blu² lighter (which, apparently, has not only been discontinued in 2016, it has been completely eradicated from the Zippo website). I liked it because it was a flint-based lighter (I had heard piezoelectric ignitors would not work at extremely cold temperatures), because it was butane (I don't smoke so liquid-fuel Zippo lighters would evaporate before I could use them), and because it was a genuine Zippo (thus, likely to work correctly all the time and for a long time.) It generally worked just fine—I don't use it much at all, though, so any frequent user will likely have encountered these problems already. I refilled it numerous times over the years and, in general, it worked great. (I did read online a recommendation to completely empty the lighter of butane before refilling by depressing the fill-valve until the "tank" is empty. I'm not sure if that's necessary, though.)
Recently, though, I started getting a really anemic flame. It was enough to make fire, but nothing like the torch-like behavior I was used to. It was such a weak flame that you could blow it out—so much for "windproof"!

I checked online to see if this was a problem and if there was a solution. I found Mark Shell's video on fixing his Zippo Blu which is basically exactly what I'm about to outline here, so if you'd prefer to watch a video, then Mr. Shell's is as good as any.
Indeed, flint and debris filled the vent holes around the lighter burner—almost certainly the cause of the small flame:

I used a straight pin like Mr. Shell and poked the vents clear:

As you can see, the vent holes are now rather clear by comparison:

Unlike normal people, I don't have a spray-air can around so I resorted to an air compressor blower to get rid of the rest of the loose dust and dirt:

Finally the results: a nice strong flame again:

WordPress Static Front Pages with Sidebars
Posted: 2018-June-4 Filed under: Computers Leave a comment »On another site I have, I had changed the front page to a static front page and noticed the sidebar was missing. I didn't really mind much but finally got around to fixing it. I did an inordinate amount of digging, but finally found this WordPress forum topic that asked the same question.
The answer is simple: change the template for the static page to one that includes sidebars. I'm using a child theme of Twenty-Eleven so the page has a default template of "Default Template", but by switching it to "Sidebar Template", the sidebars appeared.
And here I was digging around in the PHP code to try and find out how to do it. Nonetheless, given how much out-of-date and mis– information there is out there, I thought I'd go ahead and make this post to hopefully save someone else the trouble.
Avoid windshield ice scraping by shutting off the defroster early
Posted: 2018-February-5 Filed under: Travel | Tags: freezing, ice, windshield Leave a comment »When the temperature stays a few degrees below freezing all day, the ice and snow melted by a car's defrosters will refreeze and need to be scraped off next time. I wondered if I could alleviate this problem and I tried it on a day when it did stay so cold—and when it was snowing.
About 5 minutes from my destination, I turned off the car's interior heat altogether. It didn't affect the interior temperature too much, but I figured the windshield surface would quickly cool to freezing as well. (The cooling of the windshield was enhanced by car's forward motion equating to a stiff wind blowing on it.) I minimized use of the windshield washer, only enough to keep the windshield clear.
The next day, the car was covered in snow. But the surface of the windshield—and all the glass for that matter—was free of ice. The snow had not melted-then-froze (on what would have been the warmed glass) so there was nothing to scrape, and it swept off cleanly. Trying it several more times, it appears to work when the air temperature is far below freezing (lower than -5°C / 20°F) otherwise the glass just doesn't cool enough.
Work Around Address Book's Rollover Suite Bug to Calculate Age
Posted: 2016-May-16 Filed under: Computers | Tags: 10.6.8, Address Book, OSX, Snow Leopard Leave a comment »This is a start to working around a known Rollover Suite bug in Apple "Snow Leopard" OSX 10.6.8's Address Book application, version 5.0.3 (as noted on Apple's support group). The application contains a really cool feature where one can write AppleScripts that appear as pop-up menu choices. A built-in example is the way you can click on an address field and "Copy Mailing Label" which does an okay job formatting a mailing label for that person's address.
This is accomplished by writing an Applescript that has the following form:
using terms from application "Address Book"
on action property
return "" -- a string of "maiden name", "phone", "email", "url", "birth date", "custom date", "related name", "aim", "icq", "jabber", "msn", "yahoo", or "address"
end action property
on should enable action for thePerson with theEntry
return true -- if the menu choice should appear
end should enable action
on action title for thePerson with theEntry
return "" -- the text of the menu choice to display
end action title
on perform action for thePerson with theEntry
-- Perform the action if the user clicks the menu choice.
end perform action
end using terms from
So if you plug in something like this:
using terms from application "Address Book"
on action property
return "phone"
end action property
on should enable action for thePerson with theEntry
return true
end should enable action
on action title for thePerson with theEntry
return "Dial number"
end action title
on perform action for thePerson with theEntry
-- Dial the number.
end perform action
end using terms from
And you save it as a compiled script in ~/Library/Address\ Book\ Plug-Ins/ (that is, your user account's Library/Address\ Book\ Plug-Ins/), then the next time you restart Address Book, it'll activate. If you click on the label for a phone number, you'll see a new menu choice like this:
 As I had mentioned, there's a known bug where this, in many cases, doesn't work—with birthdays, custom dates, or related names, for instance. I took a wild guess as to the problem and did make a workaround for birthdays and made a working way to simply display the age of someone in the "birthday" field.
The trick was that the Address Book application doesn't execute the should enable action, action title, nor (presumably despite not testing it explicitly) perform action script terms correctly. In short, it doesn't specify thePerson nor theEntry. For things like custom dates this is a problem because I think you'd need theEntry variable to figure out which custom date is being clicked. But for things like birthdays you can fake it by using the current selection of the address book.
At least assuming only one entry is selected.
So I made up a script that calculates the age of a person and adds that to a menu choice on jeir birthday. Here's the script:
using terms from application "Address Book"
on action property
return "birth date"
end action property
on action title
tell application "Address Book"
try
set theCurrentPeople to selection
if (number of items in theCurrentPeople) is 1 then
set theCurrentPerson to item 1 of theCurrentPeople
set theBirthdate to (theCurrentPerson's birth date as date)
tell me to set theAge to roundOff from (((current date) - theBirthdate) / (365.25 * days)) to 1.0E-3
return "Age " & (theAge as text) & "."
else
return "Select one person."
end if
on error msg
return "Error: " & msg
end try
end tell
end action title
on should enable action
return true
end should enable action
on perform action for thePerson with theProperty
return ""
end perform action
end using terms from
on roundOff from num to precision
set theFixed to round (num / precision)
return (theFixed as number) * precision
end roundOff
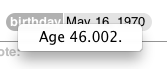
And it looks like this:
Removing Duplicate Messages in Apple's OSX Mail
Posted: 2016-February-26 Filed under: Computers | Tags: Apple, Apple Mail, OSX, Python, Snow Leopard, UNIX 5 Comments »I'm still running Snow Leopard (a.k.a. OS X 10.6.8) and using Apple's Mail version 4.6. I also tend to keep everything, so Mail is bloated with thousands of e-mails dating back to—believe it or not—October 14, 1990 (and checking, it's actually just shy of 100,000 messages). Over the years, Mail has created duplicate messages now and then. I did a bit of research and there are some tools to do it. For instance, Bohemian Boomer's article on Remove Duplicate Messages refers to the so-named AppleScript that does what it says. While I gather it would eventually work, scripting Mail with AppleScript is not exactly fast, and I found it was processing thousands of messages per hour and not the most robust architecture for such a huge project so I stopped it.
Nick Shubin's article on Finding Duplicates in the Mail Database talks about how each message is stored in the ~/Library/Mail/Mailboxes tree in its own *.emlx file. He used a program called Find Duplicate Files by Araxis which would probably work fine.
My technique was similar, although I didn't clean up the attachments files at all. I had written a Python script that would scan files and find duplicates. The original purpose was to replace the duplicates with UNIX "hard links"—where two or more files would point to the same data on disk (as opposed to a "soft link" where on directory entry points to another, much like a Finder alias). There's a whole history about how the data on disk is just stored in chains and is referenced by a link to the data's inode, so the UNIX remove (rm) command is also called the less-ominous and more-accurate unlink. (Something like that anyway … it's been decades since I looked at file systems that closely.)
Anyway, I added a couple options so I could delete files instead (omitting the ln commands to build the links). I closed Mail and ran it on my tree. In a half an hour, it found tens of thousands of duplicates. I had confidence in the program I wrote (having tested it in the past) so I went ahead and removed the duplicates.
Back in Mail, I figured it would be wise to select all the affected mailboxes and Mailbox:Rebuild them. Once I was done, I noticed a few duplicates still appeared in Mail.
It turned out—probably because of some odd rule I had added to Mail—that one message would have a color key in its XML extension and the other would not. Specifically, the difference between two duplicates was only:
<key>color</key>
<string>000000</string>
So I used TextWrangler to search all the files and simply remove that combination (figuring it was not harmful since it was setting some color to black which was probably the default anyway.) Running my script a second time, I got another few thousand messages and removed them. There may be more, but I haven't found them yet and I'm satisfied.
And yeah, someday I'll put that Python script in open source somewhere or other. For now, it's not adequately commented so I'll hold off on publishing it.
Writing to Microchip's PIC Internal EEPROM Without Waiting
Posted: 2015-December-30 Filed under: Computers, Experiments and Testing | Tags: 12F683, CCS, EEPROM, interrupts, Microchip, MPLAB, Olimex, PIC, PIC12F683, PICSTART+ 1 Comment »Background
I've been working on a project where I'd like to log statistical information about power-ons and run-time to the internal EEPROM on a Microchip PIC 12F683. I don't do much advanced programming so I'm using an old version of MPLAB (v8.88) with a PICSTART+ clone by Olimex and the CCS C Compiler version 4. I realize that combination of tools is not perfect, but it suits my needs.
I have had success using CCS's write_eeprom() functions. But first, let's go back a bit.
Reading the EEPROM data from a PIC is fairly straightforward: load the EEPROM address into the EEADR register(s) (just one byte to address the 256 bytes available on the little '683), set EECON1 bit 0 ("RD" bit) to 1, then read the data out of the EEDAT.
Writing, however, is a bit more complex. In the PIC 12F683 manual, there is a snippet of code to accomplish this[1. PIC12F683 Data Sheet, Microchip, 2007.]:
BANKSEL EECON1 ;
BSF EECON1,WREN ; Enable write
BCF INTCON,GIE ; Disable INTs
BTFSC INTCON,GIE ; See AN576
GOTO $-2 ;
MOVLW 55h ; Unlock write
MOVWF EECON2 ;
MOVLW AAh ;
MOVWF EECON2 ;
BSF EECON1,WR ; Start the write
BSF INTCON,GIE ; Enable INTS
The snipped highlights the part where 0x55 and 0xAA are loaded into EECON2 just prior to starting the write. This is the focus of most problems people have getting the EEPROM to write. But I was seeing something different.
The code that CCS C generates is basically the same:
MOVF INTCON,W
MOVWF intcon_temp
BCF INTCON.GIE
BSF STATUS.RP0
MOVLW 0x55
MOVWF EECON2
MOVLW 0xAA
MOVWF EECON2
BSF EECON1.WR
BTFSC EECON1.WR
GOTO $-1
BCF EECON1.WREN
BCF STATUS.RP0
MOVF intcon_temp,W
IORWF INTCON,F
It is not as careful about clearing the general interrupts (more on that in a minute), but it does wait for the write to complete before clearing the EECON1 write enable (WREN), and is clever about resetting the GIE by saving and restoring the whole INTCON register (although it's ultimately wasting a RAM location if you, as the programmer, know what state the GIE should be and can just BSF it if necessary). The big problem I have is that it takes around 5ms for the EEPROM to perform a write—and the write_eeprom() function blocks interrupts during that time. My application is to generate a precise-as-possible ~5KHz square wave using the timer interrupts, so the result of that delay is the clock "hangs" for 5ms each time a byte is written to the EEPROM. That's no good for me.
Now a little aside … I thought the Microchip method of clearing GIE was interesting. Their Application Note #576 outlines the reason for this:
To disable all interrupts, either the Global Interrupt Enable (GIE) bit must be cleared or all the individual interrupt enable bits must be cleared. An issue arises when an instruction clears the GIE bit and an interrupt occurs "simultaneously". For example, when a program executes the instruction BCF INTCON, GIE (at address PC), there is a possibility that an interrupt will occur during this instruction. If an interrupt occurs during this instruction, the program would complete execution of this instruction, and then immediately branch to the user’s interrupt service routine. This occurs because the GIE bit was not clear (disabled) when the interrupt occurred. Normally at the end of the interrupt service routine is the RETFIE instruction. This instruction causes the program to return to the instruction at PC + 1, but also sets the GIE bit (enabled). Therefore the GIE bit is not cleared as expected, and unintended program execution may occur.
They offer 4 workarounds in the application note. The one suggested in the data sheet is to keep clearing GIE and wait for it to stick.
The reason for all this hoopla is because the EEPROM module has some protection against runaway code writing over any good data in the EEPROM, and otherwise banging it to an early death:
- EEADR and EEDAT must be filled with the address and data to write.
- EECON1.WREN must be 1
- The sequence 0x55 then 0xAA must be written to EECON2, and then EECON1.WR must be set to 1 … umm … "quickly". I haven't looked very hard, but I haven't seen a specification for this.
If I were implementing the EEPROM module, I'd pick some small number of instruction clocks from the time 0x55 is written to EECON2 to the completion of the sequence of events. Written as pseudocode, something like:
Wait for 0x55 == EECON2.
Set count to 8.
If 0xAA != EECON2, decrement count; if 0 == count, goto start.
If 0 == EECON1.WR, decrement count; if 0 == count, goto start.
Start writing the EEPROM.
I do not believe there is any kind of program-memory reader in place that checks for the exact sequence of opcodes that forms:
MOVLW 0x55
MOVWF EECON2
MOVLW 0xAA
MOVWF EECON2
BSF EECON1.WR
Nonetheless, there's little reason to deviate from that—save for a compiler that might insert the BSF STATUS.RP0 to access the EECON* register bank after the first MOVLW 0x55. However, I've also read a thread that said that even an additional NOP would thwart the EEPROM write, so keep that segment of code tight.
Down The Wrong Rabbit Hole
I thought I'd get clever and reactivate GIE right after starting the EEPROM write, then let my main program loop twiddle its thumbs waiting for EECON1.WR to clear, all the while allowing the clock to run:
BSF EECON1.WREN
BCF INTCON.GIE
BTFSC INTCON.GIE
GOTO $-2
MOVLW 0x55
MOVWF EECON2
MOVLW 0xAA
MOVWF EECON2
BSF EECON1.WR
BSF INTCON.GIE
BTFSC EECON1.WR
GOTO $-1
BCF EECON1.WREN
But all of a sudden it's dead in the water: the EEPROM stays at its initialized values. Unfortunately, I don't have a way to see if the main loop is stopped as the interrupts keep running and the outputs clock like I expect.
It seems improbable that the insertion of BSF INTCON.GIE between setting EECON1.WR and waiting for it to clear would cause such a problem—especially since it's so similar to Microchip's own code (in that case, adding the code to wait for EECON1.WR to clear).
My debugging now turns to the interrupt handling. All the interrupts funnel into one interrupt handler which just looks at the timer interrupt. I took a closer look at the setup and this is how the CCS C sets things up:
BSF STATUS.RP0 ; enable_interrupts (INT_TIMER2)
BSF PIE1.TMR2IE
MOVLW C0 ; enable_interrupts (GLOBAL);
BCF STATUS.RP0
IORWF INTCON,F
What's interesting to me is that the compiler never explicitly sets PIE1 to anything, so PIE1.EEIE is not explicitly cleared which could be related to the cause of my trouble. Performing an inclusive-OR of 0xC0 = '1100 0000' to INTCON sets both GIE to allow interrupts, and PEIE to permit the peripheral interrupts to fire. Nonetheless, I fixed the code to clear all the peripheral interrupts in my startup code. That didn't work.
As a long-shot, I figured I'd try testing the EECON1.WR right away without doing anything about it. Perhaps there's a bug/quirk in the EEPROM write module that "needs" it to be read for the EEPROM write to proceed? Alas that didn't do it. So I figured I'd change my code to match the CCS compiler and just see if that did the trick: 5ms delays and all. Surprisingly I didn't observe the 5ms delays, but it did write the EEPROM … sometimes. And apparently I've got a bug somewhere that may have to do with byte ordering …
On the other hand, maybe EECON1.WR is cleared too fast after starting a write for some reason and I should be looking to PIR1.EEIF instead. This seemed to work better for me but I don't understand why. Could I have chips with a bug? That sounds extremely unlikely.
The way I got around the potential timing issues of disabling interrupts is to work around the threat in a different way. I'd set up the EEADR and EEDAT registers then set a flag to initiate the EEPROM write. The interrupt handler itself would issue the "magic sequence" and start the write while the main program loop would wait for the flag to clear then proceed with its own wait for the write to finish.
I made a debug block of code that, instead of trying to record legit statistics, just works its way through the EEPROM, loading each address with its address once a second. I let it run for the requisite 255 seconds and checked the results. There were no errors.
Read Errors?
So maybe I have the writing down … perhaps it's in the read? I thought about changing the code to add a delay between setting the EECON1.RD bit and fetching the data, so:
movf data,W
movwf EEADR
bsf EECON1.RD
nop
movf EEDAT,W
but I doubt that would have helped since my code wasn't working well. The first problem I was having—likely "doing wrong"—was to try and increment EEADR. I changed the code to increment a separate register then load EEADR with it didn't seem to work right either. The other potential problem was using a read-and-assign function which would take a reference to a long and then try and fill it in. I was hoping to use the function inline so I'd have access to the register as a constant but the compiler wouldn't let me—the idea was to movf EEDAT,W then movwf variable, and then likewise with variable+1, etc. The compiler, internally, could do this, but it insisted variable was a constant value. And unfortunately it decided to bizarrely use the indirect addressing functionality to add a bunch of code.
I reverted back to using the compiler's built-in read_eeprom() function and I finally met with success. The values I had were updating like I expected. I'll add a bit of code to verify each byte was written correctly (and rewrite indefinitely if necessary), but otherwise I'm confident things are working like I want.
The built-in read_eeprom() function has one additional quirk that my code didn't have: it clears bit 7 of the EECON1 register before setting EECON1.RD. If you're writing your own read routine, that may be worth checking out.
But a False Success
Unfortunately I still got very odd EEPROM behavior. I was finding that sort-of random values were being inserted in the EEPROM. See, I had 4 32-bit registers I kept logging. Seemingly at random, some of the registers were somehow set to register | 0x00000200 although the 0x02 value could appear at any byte, typically the second to lowest. And not always.
I kept working on the EEPROM write function, adding a bit of code that would re-read the value and keep trying to write it back. I also got generous with the write code, as apparently on the 12F683, messing with EECON1, EEADR, or EEDAT before both EECON1.WR cleared and PIR1.EEIF was set could cause write problems.
I also set up the write routine to reset EEADR to 0xFF (which I was not using) so any spurious writes would not affect any valid data.
But I was still getting the same problems. By now I figured the writing was correct and that there must be some error with the registers in RAM. I suspected the read routines so I decided to write my own.
They are particularly vanilla routines, merely reading a byte and putting it away (fetching 4 bytes in a row is left as an exercise to even the most inexperienced programmer). They only have two special features: before initiating a write, it waits for EECON1.WR to be cleared, and after the write is complete, it sets EEADR to 0xFF.
This has mostly cleared up my problems. I still see that spurious 0x02 appear, but it's much less frequently. I have no idea how to proceed from here.
Another Gotcha
Actually, several.
I found a Microchip forum topic that suggested to turn on brown-out reset, since a brown-out can cause random data to be written to EEPROM. It didn't affect my application at all since I was either using a solid 5V supply or the power was shut off and the 5V rail dropped to 0V.
Likewise, another forum topic suggests problems with power-supply decoupling capacitors could be at fault. A saggy rail when writing to the EEPROM could cause problems. Similarly, an inadequate pull-up resistor on the MCLR pin—if configured as a reset—could cause similar problems.
Power Loss Data Integrity
One other thing I realized was if the power was lost while the registers were being written, the code would never know there was a problem. Since I had the space, I made a second mirrored set of registers. Before starting to modify one set, the code sets a flag in the EEPROM by setting one byte to 0xFF. Once it finishes modifying that set, it resets the byte to 0x00. Then it repeats with the other set, setting a different byte to 0xFF, modifying the set, and resetting it to 0x00.
On boot-up, the code checks for the 0x00 in the right place. It uses the values from the first valid set it finds (under the assumption that writing completed successfully.) If both sets are invalid, it just resets all the values as they can't be guaranteed good.
I considered setting up a CRC check but decided it was not that critical. These logging values are not for any mission-critical function, so I didn't care if they got mysteriously garbled.
Conclusions
The PIC internal EEPROM has a number of quirks and requirements that are not immediately obvious:
- EEADR and EEDAT are not normal registers and shouldn't be treated as such. For instance, although valid, don't try and EEADR++ or incf EEADR.
- Reading data takes a couple instruction cycles, but writing data takes approximately 5ms that varies with temperature and input voltage.
For reading data from the EEPROM:
- Wait for EECON1.WR to be cleared in case a write is still in process.
- Set EEADR to the address to read.
- Set EECON1.RD.
- Read the value from EEDAT.
- If you are have trouble reading, try a BCF EECON1.7 before the BSF EECON1.RD (maybe only if you're using a PIC12F683). Also, try fetching the value from EEDAT as soon as possible after issuing the read request.
- Once done reading set EEADR to a location in EEPROM you are not using in case of spurious writes (particularly during a brownout/power loss.)
For writing data to the EEPROM:
- Set EEADR and EEDAT to the address and data.
- Wait for EECON1.WR to be 0 to ensure the last write finished.
- Set EECON1.WREN to 1 to allow the EEPROM to be written.
- Make sure interrupts can't delay execution of the "magic" sequence (either by executing this within a top-priority interrupt routine, or after disabling interrupts):
MOVLW 0x55
MOVWF EECON2
MOVLW 0xAA
MOVWF EECON2
BSF EECON1.WR
- On some PICs like the 12F683, wait for both EECON1.WR to be cleared and for PIR1.EEIF to be set before changing EECON1, EEADR, or EEDAT.
- In theory you can re-enable interrupts and continue running code. But for better EEPROM protection, clear EECON1.WREN as soon as EECON1.WR is 0.
- Verify and retry all writes for added assurance.
- Once done writing set EEADR to a location in EEPROM you are not using in case of spurious writes (particularly during a brownout/power loss.)
Recent Comments